Showing posts with label mixed media. Show all posts

Saturday, March 25, 2017

Paverpol Covered Canvas

Hi everyone Steph Ackerman here today with a tip on using Paverpol.

I wanted to create a canvas, but unfortunately I was out of Transparent Paverpol.  If you have perused the store you'd see that Paverpol also comes in Black, Gray, Light Fleshtone and Bronze, so there are lots of possibilities.


I had some Light Fleshtone so I poured some into a container then put in some fabric.


I placed the fabric on a canvas and used additional Paverpol to adhere the fabric to the canvas.  I wanted texture so I used the handle of a paint brush to move the fabric around.  It dried within 24 hours with some amazing texture. 


I knew that adding color to a Fleshtone canvas would not yield the results I wanted to I decided to paint the  Paverpol covered canvas with Gesso. 


Once dry, I and began adding colors with Tattered Angels Glimmer Mists.  I began by adding some blues.
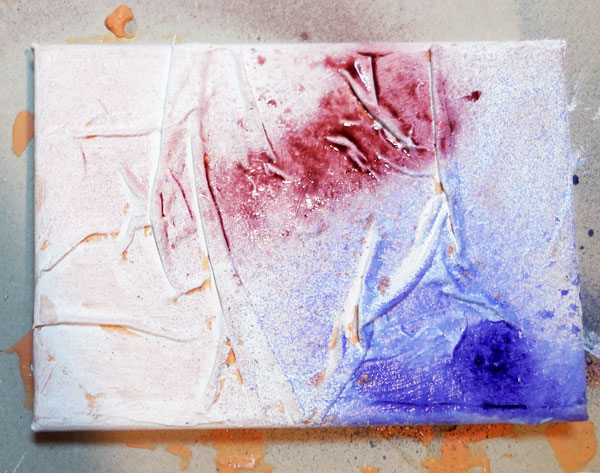

Letting it dry between colors, I added some copper and reds.


And I even added some green.  Moving the canvas allowed the colors to drip and blend together.

It looks great and I can't wait to decorate.      

In an upcoming post, I will show you what I've done with this canvas.

Steph


Friday, October 7, 2016

Paverpol Pumpkin Jars

Hi everyone, Steph Ackerman here today with my newest Paverpol project. I am really enjoying working with Paverpol and discovering  the wide variety of projects I can create.  As we head towards Halloween, it's time to start decorating.


I found some Bell Jars and decided to use Paverpol Fleshtone for my project, so I poured some into a plastic bowl.

 
I added some Terracotta Paver Color and mixed it in the Paverpol.
 
 
Next I tore strips of paper and dunked them in the mix.


Pulling the strips of paper from the Paverpol, I removed the excess and wrapped the strips around the jars.  I created texture by leaving some lumps and bumps in the paper as I wrapped the strips around the jars.

 
I continued adding Paverpol until the jars were covered.  Then I used a paint brush to add additional Paverpol around the jars until the jars looked like Terracotta.  I then placed them aside to dry.


I'm loving the texture.  Once dry, I added a bit of black paint to each and then wiped off the excess.  Then I used left over scraps of Makin's Clay® to create faces for the pumpkins.


Finally I glued yarn around the caps and added pumpkin handles created from Makin's Clay®.


These jars are perfect Halloween decorations.


Thanks for stopping by today.

Steph

Friday, September 23, 2016

Creepy Crawlies at Halloween

Hi everyone, Steph Ackerman here today with my newest Paverpol project.


It's almost Halloween and it's time to start decorating.  Paverpol is an amazing sculpting medium that has so many possibilities.  I needed  some webbing to accent this wood house, so I poured Transparent Paverpol into a container and dunked in a small amount of Pavercotton. 


After squeezing out the excess Paverpol, I placed it on the house and gently pulled it apart, stretching it from one side to the other.  I love the web effect I achieved.


I placed it aside to dry, then added spiders amongst the webbing.

 
Using a chipboard cat from Eyeconnect Crafts, I painted it black and adhered it around the house.
 
 
The house was a perfect size for a votive candle.


Isn't it creepy when the lights are off and the candle is lit?


What will you create with Paverpol today?

Thanks for stopping by.

Steph

Thursday, September 1, 2016

Under The Sea

Hi!
I am going to show you a mermaid
I created using not only Paverpol the hardener but

 I went to visit my sister in Florida a few years ago and
came back with a few pieces of driftwood SOOO when
I thought I would create something with a mermaid
I figured this was the perfect time to use one the wood pieces!

 I actually added some PP to seal it and then sprinkled some
sand on top as well.
Once that dried I started on my mermaid.
I used a thicker wire, wrapped some aluminum foil and masking tape
and then coated her with t-shirt strips dipped in a cambo
(sorry I was making her while watching TV and forgot to get pics of that stage)
Since I had received my container of ART STONE (YEAH!)
I decided to try it out.
I added some grey PP mixed with a bit of red Paver color powder and 
"painted" her tail with it.
While still wet I added the art stone BUT wanted a mix of colors
so I just started dotting and dabbing a few powder Paver Colors.
The only thing I was worried about was once I got it the color I wanted
and the powder mixed in, it still had a dusty feel to it.
So I added transparent PP, but that took some of the pops of color away.


I ended up trying some yarn for hair...gotta work on perfecting that! 
 I think it still turned out pretty cool looking.
Trial and error, that's my middle name!


Thursday, August 18, 2016

Flower Pot Fairy

Hi.
Welcome to another trial and error of Kim and Paverpol!


I have been trying to watch and read anything and everything
I can about creating with Paverpol products.
The problem is I am the type of person that no matter what
is watched or read; trial and error is still the best way I learn.
For this project I started with a normal every day pot...
 Then a container of flesh and bronze PP that I added...
TISSUE PAPER to...
I ended up with a pulpy mess, but not to be stopped by a bit of pulp...
I made it work...took awhile to spread it and make it stick.
I ended up adding some gray and bronze PP to the dried pot...
Wanting to make it look like a true pot I added mesh, black/gray
bits of gravel, a paper plate (I soaked with PP) and sand...
The gravel ends up on top of the mesh but the pictures did 
not take real well because it's real shiny.
I was real happy with the way the paper plate and sand turned out.
I wasn't sure if the sand would harden enough using transparent PP, 
but itdid. That sucker is hard as a glass plate!
Next I started my fairy.
Started with wire, aluminum foil, and masking tape.
Then added cut up t-shirt dipped in flesh and bronze PP...
 The clothes I used gray PP but added a few powders to end up with a
purplish color. Made a mess and had to go back over my little fairy
with the initial flesh and bronze combo.
The wings were an actual butterfly I had that I painted transparent PP on,
then poured red and gold glitter over both sides. 
Glued them on and added a few fabric flowers to her head...
Then added everything together and here is my Flower Pot Fairy...

Oh and I added some spanish moss that was soaked in PP.
Not exactly how I started out picturing it but some mistakes turn out
to be wonderful finished products!

Friday, August 5, 2016

A Jar of Possibilities with Paverpol

Hi everyone, Steph Ackerman here today with my newest Paverpol project. Paverpol is an amazing sculpting medium that hardens fabric or paper into any shape you desire.


Since Paverpol can be somewhat messy, I find it's important to have my supplies readily available before committing to my project.   So I gathered Transparent Paverpol, a bowl, a glass jar and some torn strips of fabric. 


Pouring Paverpol into a bowl, I added the strips of fabric and coated them with Paverpol.

 
Removing the strips of fabric, I squeezed out the excess Paverpol and placed the strips around the jar.   I repeated this process until all the strips were in place.  To give the fabric dimension, I pinched portions of the fabric strips as I arranged them on the jar. Then I put the jar aside to dry.  Look at all that dimension!  As the fabric hardened, it really kept it's shape on the jar.


Once dry, I spritzed the hardened fabric with Tattered Angels Glimmer Mists.  I spritzed on 4 different colors, allowing each one to dry before spritzing the next (heat setting can speed up the drying process).  This allowed all the colors to show and not blend together. 


Finally I added assorted Prima flowers, adhering them with Beacon Adhesive 3-in-1 Advanced Craft Glue.  Now my jar is ready for anything - holding small trinkets - holding notes to loved ones - holding candy - and so much more.
 
 
I'm thinking these would make amazing holiday gifts for family, friends and even teachers.  Simply personalize them with the colors they love.
 
Thanks for stopping by today.
 
Be sure to stop by the blog to see lots of fun projects using Paverpol.
 
Steph