Showing posts with label colourful. Show all posts

Monday, April 3, 2017

Time Is Precious Canvas

Hi everyone Steph Ackerman here today with my finished canvas. 


Last week I showed you some tips on using Paverpol and how to change it's color.  Using Tattered Angels Glimmer Mists, I created a fun colorful background.


Once the canvas dried, I used a mesh stamp to stamp around the edges.


I placed some chipboard clocks on a large flower and added them to the canvas with a pearl brad.


I added a coordinating sentiment to the center.


So what do you think?  Don't you love all that dimension?

Steph

Saturday, March 25, 2017

Paverpol Covered Canvas

Hi everyone Steph Ackerman here today with a tip on using Paverpol.

I wanted to create a canvas, but unfortunately I was out of Transparent Paverpol.  If you have perused the store you'd see that Paverpol also comes in Black, Gray, Light Fleshtone and Bronze, so there are lots of possibilities.


I had some Light Fleshtone so I poured some into a container then put in some fabric.


I placed the fabric on a canvas and used additional Paverpol to adhere the fabric to the canvas.  I wanted texture so I used the handle of a paint brush to move the fabric around.  It dried within 24 hours with some amazing texture. 


I knew that adding color to a Fleshtone canvas would not yield the results I wanted to I decided to paint the  Paverpol covered canvas with Gesso. 


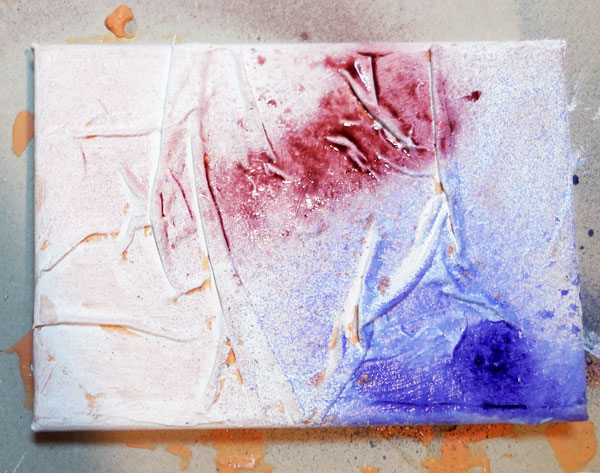
Once dry, I and began adding colors with Tattered Angels Glimmer Mists.  I began by adding some blues.


Letting it dry between colors, I added some copper and reds.


And I even added some green.  Moving the canvas allowed the colors to drip and blend together.

It looks great and I can't wait to decorate.      

In an upcoming post, I will show you what I've done with this canvas.

Steph


Friday, January 27, 2017

Beautiful Moments Canvas

Hi everyone, Steph Ackerman here today with a beautiful moments canvas.


I began by using Pavercotton which is a cotton fiber.  I pulled apart the Pavercotton then dunked it in Transparent Paverpol.  After squeezing out the excess Paverpol, I placed the strips on the canvas, then moved them about the canvas until I created a pattern I liked.


As the Pavercotton dried, it created a nice 3 dimensional pattern.  Look at all that texture!

 
Once dry, I spritzed assorted colors of Tattered Angels Glimmer Mists about the canvas.  So the colors stayed true, I heat set between each color.


To decorate, I added several flowers to the upper corner.

 
Finally, I adhered a clothes pin to the canvas and used it to hold a beautiful moments tag.

 
I'm loving all the texture on this canvas.
 
What do you think?
 
Steph


Friday, November 4, 2016

Beautiful Lady - Part 2

Hi everyone, Steph Ackerman here today with the completion of my newest Paverpol project - Beautiful Lady. 


This is what she looked like in my previous post.

 
I used a paint brush to add Transparent Paverpol to small strips of fabric that I wrapped around her face and arms.  I found a paint brush worked easier on small pieces of fabric.
 
 
I dunked larger fabric strips in the Paverpol to create her dress.

 
This is what she looks like all covered in fabric.  I wrapped the fabric loosely around her so I could create folds and pleats in her dress.  I allowed her to dry 24 hours then covered her entirely with Gesso.


After letting her dry for another 24 hours, I spritzed her with Tattered Angels Glimmer Mist.

 
As she dried, the color lightened dramatically.  I added an assortment of flowers around her waist, along the hem and the pleat of her dress.  I also put a small bouquet in her hand.

 
To finish, I painted her face and hair then created a necklace using Robin's Nest dew drops.


What do you think?  I'm pretty pleased with how she turned out. 

Thanks for stopping by today.

Steph


Friday, September 9, 2016

Spooky Skull with Paverpol

Hi everyone, Steph Ackerman here today with my newest Paverpol project. Paverpol is an amazing sculpting medium that hardens whatever it coats.  Today I'm working with paper!

 
Paint a paper mache skull any color you desire.  I used red, thinking I might leave some of the skull visible for a "bloody" effect.

 
I poured Paverpol Transparent into a container, then added torn strips of pattern paper and mixed them in the Paverpol.  Paverpol not only adds dimension once hardened, it also acts as an adhesive.

 
I removed excess Paverpol from the strips and placed the strips of paper on the skull.  I continued adding pattern paper strips until the skull was completely covered.  I built up the layers for depth.  I also turned over some of the strips to allow some of the pattern paper to show.


Once the skull was completely covered, I left it to dry over night.  Look at all that texture.


Once dry, the texture was awesome.  I used an assortment of paints to paint the skull, blending colors as needed and working the paint into all the crevises.


The dimension is evident on the skull.  I love it.  Paper soaked Paverpol hardens into an amazing textured finish. 


I could have added an assortment of elements to really "funk" up the skull, but I think a cute bow created with the Bowdabra was all she needed, don't you?

Thanks for stopping by today.

Steph


Steph

Friday, February 19, 2016

SteampunkFish - fun with Paverpol

Rosalie Levi - Sculptor, Montreal, Quebec

Hi everyone. I’m Rosalie Levi, and this is my first project posted to the shared blog. I’ve been a Sculptor/Visual Artist for over 33 years. I create flowing, dynamic sculptures and paintings that invoke the viewers emotions and imagination. As you will see in this fun project, I love car parts and other fun found objets, and incorporate them into my pieces.

In this sculpture, I have used some small gears normally found in a car transmission. I have also used some items that are new to me, such as the Creative Paperclay and the Colourarte pigments.


Here is SteampunkFish:


You will need the following supplies:
100” - 12 gauge electric wire 3/16” stainless steel rod
Tin foil
1” and 2” masking tape

3 wooden skewers
2 1/2 coil or spring or ring (for the eye)

Black Paverpol
Paverplast
Paversand - Black Coarse
Creative Paperclay
Colourarte Artist Pigment

  -kiwi, bolivian blue, african jade, blue bayou
Protective gloves
Popsicle sticks for stirring Basting brush 1 1/2” wide Water mister
Items to decorate the base

Brick or other item for the base that can be drilled. Get creative. It just needs to have some weight to it so the sculpture will be stable.


Step 1
Build your armature using the 12 gauge, rod, skewers, 2 1/2” ring/coil/spring and 1” tape. (template available upon request)
40” wire for outer shape, 15” wire for inside curve in body, 15” x 2 for outside tail curls, 13” wire for inside curve in body. Use skewers to add support to armature. Secure all joints as in the photo. (note;under eye, skewers on both sides of rod for added support)

Step 2
Cover armature with bands of tin foil. ( cut tinfoil into pieces of 4” wide, and fold in 3 parts so that you have a band of approx. 1 1/4”- 1 1/2” wide) Tape each piece well. 


Reinforce the area around the eye with a band of tinfoil that has been twisted like a rope, and surround the spring with it. Secure everything in place.


Leave the eye and the curved section towards the rear open(as seen in the final piece). Keep building up the body as thick as you want it, so you don’t feel the wires and skewers beneath. Create clean edges and curves (follow the armature) by smoothing with your hands and taping well. Use large bands of tinfoil (tear 8” pieces and fold in 3 for added strength) and use the 2” masking tape to cover the whole fish.


Step 3
200 ml Paverpol to 40 ml Paverplast to create the
paste mixture. This is 50x stronger than Paverpol on its own! Mix well, and then paint one coat over all the masking tape and the base.


page3image6744


Step 4
Apply the Creative Paperclay to cover and decorate the fin and the tail (not too thin). You can get creative and add decorative details on the fin. I added little spaghetti strands of the clay in a swirl pattern. Let dry. Approx. 24hrs


Step 5
Paverplast (paverol and paverplast mixture) everything, and twice on the paper clay to reinforce it.


Step 6
Mix in to the remaining mixture approx. 100ml Paversand (or until mixture thickens and has a gritty texture.) into remaining paste. Mixture should be spreadable, like yoghurt. Apply this to the body of the fish only, with a brush. Let dry, then brush on one coat Paverpol black, to add back the shine.


page4image9176

Step 7
With the remaining mixture, thicken it up with Paverplast and Paversand, (more sand if you want it grittier) until you have a clay like substance. Roll it out or flatten it with your hands (dust hands and surface with Paverplast so it won’t stick). Apply the flattened clay to the surface of your base to cover it. This allows you to press decorative items into it. Slightly overlap edges of items with the clay to keep them stable on surface of base.


Step 8
Before painting, remove any product on the surface of the decorative items that doesn’t belong. Add product where needed. (small dips or holes)
Once perfected to your satisfaction, coat one layer of Paverpol black over the clay areas, to add shine.


steampunk fish rosalie levi paverpol paversand contemporary sculpture recycle steampunk
Step 9
Add color! Get creative. Dry brush or paint. This is up to you. What I did was dry brush on a dark metallic silver everywhere. Let dry. It’s important to wear protective gloves when using the Colourarte. I misted one side of fish body only and using a popsicle stick, I sprinkled very small amounts of pigment onto the horizontal surface. Then, I turned the surface until the paint dripped the way I wanted it to, adding misted water as needed. Let dry. Repeat other side. Then I did the base the same way. I chose not to glue the rod in the drilled hole in the base. This gives the sculpture dynamic, because the fish can be spun on the base.


If you want to see more works by me, please visit www.rosalielevi.com/art/ or if you would like a template of the above project, contact me at info@rosalielevi.com. I offer workshops in the Montreal, Quebec and will soon be offering live classes online.