Friday, September 23, 2016

Creepy Crawlies at Halloween

Hi everyone, Steph Ackerman here today with my newest Paverpol project.


It's almost Halloween and it's time to start decorating.  Paverpol is an amazing sculpting medium that has so many possibilities.  I needed  some webbing to accent this wood house, so I poured Transparent Paverpol into a container and dunked in a small amount of Pavercotton


After squeezing out the excess Paverpol, I placed it on the house and gently pulled it apart, stretching it from one side to the other.  I love the web effect I achieved.


I placed it aside to dry, then added spiders amongst the webbing.

 
Using a chipboard cat from Eyeconnect Crafts, I painted it black and adhered it around the house.
 
 
The house was a perfect size for a votive candle.


Isn't it creepy when the lights are off and the candle is lit?


What will you create with Paverpol today?

Thanks for stopping by.

Steph

Thursday, September 15, 2016

Just A Swinging

Hi.
Have you ever had an idea that got stuck in your head,
something that you knew you had to create or it would drive you nuts?
Well that is what happened with me...


I got this knobby gnarled looking tree stuck in my head and had
to do something with it.
Initially I was going to do a Halloween themed something, but
was not ready for that yet.

So using aluminum foil and masking tape I created my tree...
once done I started using some of my ribbon scraps, pieces of twine
and small strips of fibers; trying for a uneven bark like look.
I used several colors of Paverpol (combos of grey, bronze and flesh)
as well as adding Paver Color to transparent to get different shades.


Knowing I wanted a swinging child I attached the tree to a piece of styrofoam
after having used grey PP and light brown and green Paver Color on it.


I love that I could use PP transparent to attach it right to the 
styrofoam.
To attach the "swing" I drilled a hole through the limb (YES it was hard enough 
and strong enough) and ran a chain through it.
For my little swinger I molded her using aluminum foil and tape
then added cotton strips soaked in flesh and bronze PP.
After she dried I painted a shirt and shorts on her.
And using twine soaked in transparent PP for hair then paint for color.

I attached her to the chain with transparent PP
After setting it all up I decided it needed something
extra so I added a few fabric flowers.


Tuesday, September 13, 2016

Paverpol Bangle Bracelets by Linda Ann Smith

Unique and artistic bangle bracelets are easy to make  To learn how to make these beautiful bracelets, click on the video below the photos.
BANGLE BRACELETS by Linda Ann Smith

Form the bracelets from Paverpol, plastic bottles and fabric strips


Paint with Vivid Ultra-Metallics
Embellish with pearls.


Wear and enjoy!

HERE IS THE VIDEO SHOWING HOW TO MAKE THESE!

Friday, September 9, 2016

Spooky Skull with Paverpol

Hi everyone, Steph Ackerman here today with my newest Paverpol project. Paverpol is an amazing sculpting medium that hardens whatever it coats.  Today I'm working with paper!

 
Paint a paper mache skull any color you desire.  I used red, thinking I might leave some of the skull visible for a "bloody" effect.

 
I poured Paverpol Transparent into a container, then added torn strips of pattern paper and mixed them in the Paverpol.  Paverpol not only adds dimension once hardened, it also acts as an adhesive.

 
I removed excess Paverpol from the strips and placed the strips of paper on the skull.  I continued adding pattern paper strips until the skull was completely covered.  I built up the layers for depth.  I also turned over some of the strips to allow some of the pattern paper to show.


Once the skull was completely covered, I left it to dry over night.  Look at all that texture.


Once dry, the texture was awesome.  I used an assortment of paints to paint the skull, blending colors as needed and working the paint into all the crevises.


The dimension is evident on the skull.  I love it.  Paper soaked Paverpol hardens into an amazing textured finish. 


I could have added an assortment of elements to really "funk" up the skull, but I think a cute bow created with the Bowdabra was all she needed, don't you?

Thanks for stopping by today.

Steph


Steph

Saturday, September 3, 2016

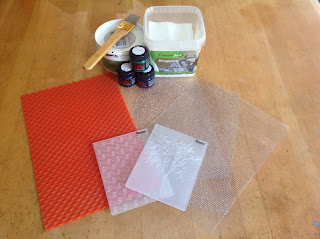
Paverpol Texture Sheets

Paverpol Texture Sheet Materials List:
Paverpol, any color
Paverpol Wrappers
Plastic clay texture sheet, Darice embossing plate, or silicone texture mat
Water
Paintbrush


One of my favorite things to do with Paverpol is to make texture sheets using  Paverpol, wrappers, and clay texture sheets. The wrapper soaks up the Paverpol and takes the shape of whatever texture sheet you use. When dry, I love to paint them with colourarte silks acrylic glazes. They are a great way to add interesting textures and beautiful colors to your projects.

First, thin the Paverpol with a little bit of water. Then open up a wrapper, and place it on the concave side of the texture sheet. 


Dip your brush into the Paverpol mixture and brush onto the wrapper. 

After the wrapper is well moistened but not soaking wet, tap the brush all over to push the wrapper into all the crevices of the texture sheet. You know you're done when you can see the pattern fairly well through the wrapper. 

Let dry for several hours. You can use a fan to speed up the process. When completely dry, peel the wrapper off the texture sheet. Store sheets in a Ziploc bag to keep them pliable.

Now you can use this textured Paverpol wrapper in a variety of ways. 


Thursday, September 1, 2016

Under The Sea

Hi!
I am going to show you a mermaid
I created using not only Paverpol the hardener but

 I went to visit my sister in Florida a few years ago and
came back with a few pieces of driftwood SOOO when
I thought I would create something with a mermaid
I figured this was the perfect time to use one the wood pieces!

 I actually added some PP to seal it and then sprinkled some
sand on top as well.
Once that dried I started on my mermaid.
I used a thicker wire, wrapped some aluminum foil and masking tape
and then coated her with t-shirt strips dipped in a cambo
(sorry I was making her while watching TV and forgot to get pics of that stage)
Since I had received my container of ART STONE (YEAH!)
I decided to try it out.
I added some grey PP mixed with a bit of red Paver color powder and 
"painted" her tail with it.
While still wet I added the art stone BUT wanted a mix of colors
so I just started dotting and dabbing a few powder Paver Colors.
The only thing I was worried about was once I got it the color I wanted
and the powder mixed in, it still had a dusty feel to it.
So I added transparent PP, but that took some of the pops of color away.


I ended up trying some yarn for hair...gotta work on perfecting that! 
 I think it still turned out pretty cool looking.
Trial and error, that's my middle name!