Rosalie Levi - Sculptor, Montreal, Quebec
Hi everyone. I’m Rosalie Levi, and this is my first project posted to the shared blog. I’ve been a Sculptor/Visual Artist for over 33 years. I create flowing, dynamic sculptures and paintings that invoke the viewers emotions and imagination. As you will see in this fun project, I love car parts and other fun found objets, and incorporate them into my pieces.In this sculpture, I have used some small gears normally found in a car transmission. I have also used some items that are new to me, such as the Creative Paperclay and the Colourarte pigments.
Here is SteampunkFish:
 You will need the following supplies:
100” - 12 gauge electric wire 3/16” stainless steel rod
Tin foil
1” and 2” masking tape
3 wooden skewers
2 1/2 coil or spring or ring (for the eye)
Black Paverpol
Paverplast
Paversand - Black Coarse
Creative Paperclay
Colourarte Artist Pigment
-kiwi, bolivian blue, african jade, blue bayou
Protective gloves
Popsicle sticks for stirring Basting brush 1 1/2” wide Water mister
Items to decorate the base
Brick or other item for the base that can be drilled. Get creative. It just needs to have some weight to it so the sculpture will be stable.
Step 1
Build your armature using the 12 gauge, rod, skewers, 2
1/2” ring/coil/spring and 1” tape. (template available upon request)
Step 2
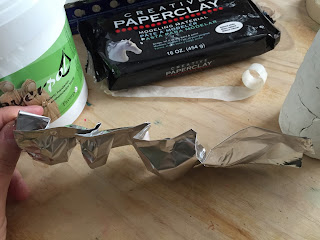
Cover armature with bands of tin foil. ( cut tinfoil into pieces of 4” wide, and fold in 3 parts so that you have a band of approx. 1 1/4”- 1 1/2” wide) Tape each piece well.
Cover armature with bands of tin foil. ( cut tinfoil into pieces of 4” wide, and fold in 3 parts so that you have a band of approx. 1 1/4”- 1 1/2” wide) Tape each piece well.
Reinforce the area around the eye with a band of tinfoil that has been twisted like a rope, and surround the spring with it. Secure everything in place.


Leave the eye and the curved section towards the rear open(as seen in the final piece). Keep building up the body as thick as you want it, so you don’t feel the wires and skewers beneath. Create clean edges and curves (follow the armature) by smoothing with your hands and taping well. Use large bands of tinfoil (tear 8” pieces and fold in 3 for added strength) and use the 2” masking tape to cover the whole fish.
 Step 3
200 ml Paverpol to 40 ml Paverplast to create the
paste mixture. This is 50x stronger than Paverpol on its own! Mix well, and then paint one coat over all the masking tape and the base.
Step 4
Apply the Creative Paperclay to cover and decorate the fin and the tail (not too thin). You can get creative and add decorative details on the fin. I added little spaghetti strands of the clay in a swirl pattern. Let dry. Approx. 24hrs
Step 5
Paverplast (paverol and paverplast mixture) everything, and twice on the paper clay to reinforce it.
Step 6
Mix in to the remaining mixture approx. 100ml Paversand (or until mixture thickens and has a gritty texture.) into remaining paste. Mixture should be spreadable, like yoghurt. Apply this to the body of the fish only, with a brush. Let dry, then brush on one coat Paverpol black, to add back the shine.
Step 7
With the remaining mixture, thicken it up with Paverplast and Paversand, (more sand if you want it grittier) until you have a clay like substance. Roll it out or flatten it with your hands (dust hands and surface with Paverplast so it won’t stick). Apply the flattened clay to the surface of your base to cover it. This allows you to press decorative items into it. Slightly overlap edges of items with the clay to keep them stable on surface of base.
Step 8
Before painting, remove any product on the surface of the decorative items that doesn’t belong. Add product where needed. (small dips or holes)
Once perfected to your satisfaction, coat one layer of Paverpol black over the clay areas, to add shine.

Step 9
Add color! Get creative. Dry brush or paint. This is up to you. What I did was dry brush on a dark metallic silver everywhere. Let dry. It’s important to wear protective gloves when using the Colourarte. I misted one side of fish body only and using a popsicle stick, I sprinkled very small amounts of pigment onto the horizontal surface. Then, I turned the surface until the paint dripped the way I wanted it to, adding misted water as needed. Let dry. Repeat other side. Then I did the base the same way. I chose not to glue the rod in the drilled hole in the base. This gives the sculpture dynamic, because the fish can be spun on the base.
If you want to see more works by me, please visit www.rosalielevi.com/art/ or if you would like a template of the above project, contact me at info@rosalielevi.com. I offer workshops in the Montreal, Quebec and will soon be offering live classes online.
With the remaining mixture, thicken it up with Paverplast and Paversand, (more sand if you want it grittier) until you have a clay like substance. Roll it out or flatten it with your hands (dust hands and surface with Paverplast so it won’t stick). Apply the flattened clay to the surface of your base to cover it. This allows you to press decorative items into it. Slightly overlap edges of items with the clay to keep them stable on surface of base.
Step 8
Before painting, remove any product on the surface of the decorative items that doesn’t belong. Add product where needed. (small dips or holes)
Once perfected to your satisfaction, coat one layer of Paverpol black over the clay areas, to add shine.

Step 9
Add color! Get creative. Dry brush or paint. This is up to you. What I did was dry brush on a dark metallic silver everywhere. Let dry. It’s important to wear protective gloves when using the Colourarte. I misted one side of fish body only and using a popsicle stick, I sprinkled very small amounts of pigment onto the horizontal surface. Then, I turned the surface until the paint dripped the way I wanted it to, adding misted water as needed. Let dry. Repeat other side. Then I did the base the same way. I chose not to glue the rod in the drilled hole in the base. This gives the sculpture dynamic, because the fish can be spun on the base.
If you want to see more works by me, please visit www.rosalielevi.com/art/ or if you would like a template of the above project, contact me at info@rosalielevi.com. I offer workshops in the Montreal, Quebec and will soon be offering live classes online.


