Thursday, August 31, 2017
Monday, April 3, 2017
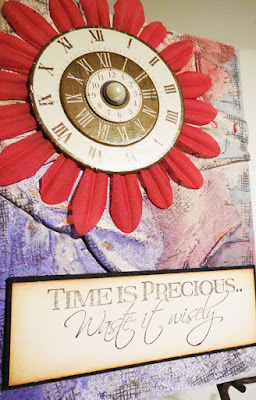
Time Is Precious Canvas
Hi everyone Steph Ackerman here today with my finished canvas.
Once the canvas dried, I used a mesh stamp to stamp around the edges.
Last week I showed you some tips on using Paverpol and how to change it's color. Using Tattered Angels Glimmer Mists, I created a fun colorful background.
I placed some chipboard clocks on a large flower and added them to the canvas with a pearl brad.
So what do you think? Don't you love all that dimension?
Steph
Saturday, March 25, 2017
Paverpol Covered Canvas
Hi everyone Steph Ackerman here today with a tip on using Paverpol.
I wanted to create a canvas, but unfortunately I was out of Transparent Paverpol. If you have perused the store you'd see that Paverpol also comes in Black, Gray, Light Fleshtone and Bronze, so there are lots of possibilities.
I had some Light Fleshtone so I poured some into a container then put in some fabric.
I placed the fabric on a canvas and used additional Paverpol to adhere the fabric to the canvas. I wanted texture so I used the handle of a paint brush to move the fabric around. It dried within 24 hours with some amazing texture.
I knew that adding color to a Fleshtone canvas would not yield the results I wanted to I decided to paint the Paverpol covered canvas with Gesso.
Once dry, I and began adding colors with Tattered Angels Glimmer Mists. I began by adding some blues.
Letting it dry between colors, I added some copper and reds.
It looks great and I can't wait to decorate.
In an upcoming post, I will show you what I've done with this canvas.
Steph
Friday, March 17, 2017
Creating A Journal With Paverpol
Creating A Journal With Paverpol
Hiya!
I wanted to share something fun AND quick with you today.
I took a plain old $1 store journal and turned it into
something any one would love to carry around.
This one I created using fabric (for the spine) that had been sitting in
some flesh colored Paverpol for the last few months.
I was scared it would not be fresh enough but there
were no problems. If you keep it in a sealed tight container AND
the fabric is completely submerged then I have had
no problems with it lasting.
This one I used the same fabric BUT decided to try the plaster
I had made using transparent Paverpol and the paverplast on the actual cover.
I turned out better than I thought.
AGAIN make sure when storing your left overs,
do it in a seal tight container.
I have tried some of the $1 store containers and not all
seal the same. I will squeeze them in the store with the lids on and see if
they make noise!
I did not take a lot of pictures on the first journal.
It was a gift I made for our Youth Pastor Rachelle at our church.
But here are a few...
Because the fabric was in flesh color I painted over it in black...
then added some satin finish to it.
The second journal I took a few more pics...
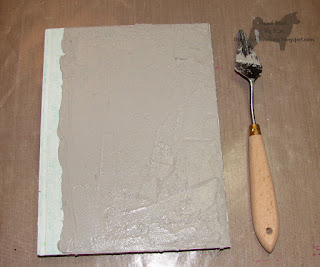
I just smeared it on with a pallet knife and let is dry
for a few hours...
Added the fabric after only this time painted it white.
I didn't like the edge I ended up with so I added some
ribbon to disguise it.
I used metallic paints to go over the plaster and
again added satin finish on the whole thing for more shine.
I really am thrilled with how both turned out.
Saturday, March 4, 2017
My Garden Angel
Hi everyone Steph Ackerman here today with my newest Paverpol project I've called My Garden Angel.
My Garden Angel stands guard in a perfect spot in my garden.
I began by covering the paper mache figure with paper towels that I coated with Transparent Paverpol. I find the paper towels are a nice way to create texture when creating with Paverpol and paper towels are very forgiving.
Once she dried, I mixed 2 parts Transparent Paverpol and 1 part Paversand in a container until I had a nice smooth consistency.
I painted a light layer of the mixture on my figure. Once she dried, I painted on a second layer. This mixture created a hardened figure that can stay outside.
Next, I used Pavercotton dipped in Transparent Paverpol to create her hair which I wrapped around her face and draped across her torso. I wanted a whispy look so I pulled and separated the Pavercotton while it was still wet.
I added some Antique Gold Pavercolor to Transparent Paverpol and applied to her hair for some color.
She now stands guard in my garden.
Thanks for stopping by.
Steph
Friday, February 17, 2017
Upcycled Vase of Flowers with Paverpol
Hi everyone Steph Ackerman here using Paverpol to create a vase for a home décor sign. With winter finally winding down, it's time to turn ourselves towards sunshine and flowers.
I began by using the Proxxon Delta Sander to sand a wood sign. Next I painted the sign with Plaid Folk Art Ultra Dye in Infra Red. This dye brushes on so smoothly and easily.
Next, I cut fabric slightly bigger than the tube and placed it in Transparent Paverpol.
After squeezing out the excess Paverpol, I wrapped it around the paper towel tube.
I allowed it to dry overnight. Then I was able to pull the tube out.
Using the Proxxon Jig Saw, I cut the Paverpol tube into 4 pieces.
Next I painted one of the tubes with Plaid Folk Art Milk Paint in Jamestown Blue.
I began by using the Proxxon Delta Sander to sand a wood sign. Next I painted the sign with Plaid Folk Art Ultra Dye in Infra Red. This dye brushes on so smoothly and easily.
Once dry, I sanded it again to get a more rustic look.
To create the vase, I began by taking a paper towel tube and covering it with plastic wrap. The plastic wrap will allow you to easily remove the paper towel tube once the Paverpol has dried.
Next, I cut fabric slightly bigger than the tube and placed it in Transparent Paverpol.
After squeezing out the excess Paverpol, I wrapped it around the paper towel tube.
I allowed it to dry overnight. Then I was able to pull the tube out.
Using the Proxxon Jig Saw, I cut the Paverpol tube into 4 pieces.
Next I painted one of the tubes with Plaid Folk Art Milk Paint in Jamestown Blue.
Finally, I added May Arts Ribbon to the top and bottom of the "vase" and adhered it to the sign with Beacon Adhesive.
Left over chipboard letters were used to create the words. Then I randomly stamped flowers from the Joy Clair Stamp set, Paisley Bouquet, around the sign.
A butterfly, created from Rinea Foils, was added atop the vase. Tattered Angels Glimmer Mists were sprayed over the sign to add a little shimmer as the finishing touch.
Paverpol makes it so easy to upcycle that I don't want to throw anything away.
What will you upcycle today?
Thanks for stopping by.
Subscribe to:
Comments (Atom)


